Adding Custom Fields to Targets
Sometimes you’d like to store data for targets but the predefined fields that the TOM Toolkit provides aren’t enough. The TOM Toolkit allows you to define extra fields for your targets so you can associate different kinds of data with them. For example, you might be studying high redshift galaxies. In this case, it would make sense to be able to store the redshift of your targets. You could then do a search for targets with a redshift less than or greater than a particular value, or use the redshift value to make decisions in your science code.
The TOM Toolkit currently supports two different methods for adding extra fields to targets: Extending Target Models and adding Extra Fields.
Extending the Target Model
Users can extend the Target model by creating a custom target model in the app
where they store their custom code. This method is more flexible and allows for
more intuitive relationships between the new target fields and other code the user
may create. This method requires database migrations and a greater understanding of
Django models to implement.
By default the TOM Toolkit will use the tom_targets.BaseTarget model as the target model,
but users can create their own target model by subclassing tom_targets.BaseTarget and adding
their own fields. The TOM Toolkit will then use the custom target model if it is defined
in the TARGET_MODEL_CLASS setting of settings.py. To implement this a user will first
have to edit a target_models.py file in their custom code app and define a custom target model.
Subclassing tom_targets.BaseTarget will give the user access to all the fields and methods
of the BaseTarget model, but the user can also add their own fields and methods to the custom
target model. Fields from the BaseTarget model will be stored in a separate table from the custom
fields, and rely on separate migrations. See the
Django documentation on multi-table inheritance.
Preparing your project for custom Target Models
The first thing your project will need is a custom app. If you already have a custom app
(usually called custom_code) you can skip this section. You can read
about custom apps in the Django tutorial
here, but
to quickly get started, the command to create a new app is as follows:
./manage.py startapp custom_code
Where custom_code is the name of your app. You will also need to
ensure that custom_code is in your settings.py. Append it to the
end of INSTALLED_APPS:
...
INSTALLED_APPS = [
    'django.contrib.admin',
    'django.contrib.auth',
    ...
    'tom_dataproducts',
    'custom_code',
]
...
You should now have a directory within your TOM called custom_code,
which looks like this:
├── custom_code
|   ├── __init__.py
│   ├── admin.py
│   ├── apps.py
│   ├── models.py
│   ├── tests.py
│   └── views.py
├── data
├── db.sqlite3
├── manage.py
├── mytom
│   ├── __init__.py
│   ├── settings.py
│   ├── urls.py
│   └── wsgi.py
├── static
├── templates
└── tmp
target_models.py
First you will need to create a custom target model. We recommend doing this in a new target_models.py file within
your custom_code app.
Note
You can also define your custom target model in the models.py file of your custom_code app, but this can cause
complications if any of your existing or future models require a foreign key relationship to the
tom_targets.Target model. This is why we recommend that you keep your custom target model in a separate file.
The following is an example of a custom target model that adds a boolean field and a number field:
 1from django.db import models
 2
 3from tom_targets.base_models import BaseTarget
 4
 5
 6class UserDefinedTarget(BaseTarget):
 7    example_bool = models.BooleanField(default=False, verbose_name='Example Boolean')
 8    example_number = models.FloatField(null=True, blank=True, help_text='Pick a number.')
 9
10    # Set Hidden Fields
11    example_bool.hidden = True
12
13    class Meta:
14        verbose_name = "target"
15        permissions = (
16            ('view_target', 'View Target'),
17            ('add_target', 'Add Target'),
18            ('change_target', 'Change Target'),
19            ('delete_target', 'Delete Target'),
20        )
The model name, UserDefinedTarget in the example (line 6), can be replaced by whatever CamelCase name you want, but
it must be a subclass of tom_targets.BaseTarget. The null=True for example_number will allow for that field
to be optional in the model form. Adding help_text="" to a field will provide text to be displayed under the form
field when editing a target and in a tooltip when hovering over the field name on the target detail page. The
permissions in the class Meta (lines 15-20) are required for the TOM Toolkit to work properly. The hidden
attribute can be set to True to hide the field from the target detail page.
Reference the Django documentation on Model Fields in order to learn more about Django models and their associated fields. The model field reference documentation will help you figure out what field options make sense for your models fields. Also, take special note of the relationship between Django models and Django model forms. This relationship is important because the TOM Toolkit uses model forms to create and edit targets.
Editing settings.py
Next you will need to tell the TOM Toolkit to use your custom target model. In the settings.py file of your
project, you will need to add the following line:
TARGET_MODEL_CLASS = 'custom_code.target_models.UserDefinedTarget'
Changing custom_code to the name of your custom app and UserDefinedTarget to the name of your custom target model.
Creating Migrations
After you have created your custom target model, you will need to create a migration for it. To do this, run the following command:
./manage.py makemigrations custom_code
This will create a migration file in the migrations directory of your custom app. You can then apply the migration
by running:
./manage.py migrate
This will build the appropriate tables in your database for your custom target model.
Note
If you are updating a more developed TOM that already has existing custom migrations that rely on foreign key
relationships with tom_targets models, you may experience errors when trying to migrate. If this happens, you
may need to edit your existing migrations to reference ‘tom_targets.basetarget’ and update the dependencies to
include a reference to a tom_targets migration 0021_rename_target_basetarget_alter_basetarget_options or later.
Convert old targets to new model
If you have existing targets in your database, you will need to convert them to the new model. This can be done by running a version of the following code. We incorporate this into a management command to make it easier to run.
Create a new file in your custom app called management/commands/convert_targets.py and add the following code:
 1from django.core.management.base import BaseCommand
 2
 3from guardian.models import GroupObjectPermission, UserObjectPermission
 4
 5from tom_targets.base_models import BaseTarget
 6from tom_targets.models import Target
 7
 8
 9class Command(BaseCommand):
10    """
11    Core code based on information found at
12    https://code.djangoproject.com/ticket/7623
13    """
14
15    help = 'A helper command to convert existing BaseTargets to UserDefinedTargets.'
16
17    def handle(self, *args, **options):
18        # Make sure Target is a subclass of BaseTarget
19        if Target != BaseTarget and issubclass(Target, BaseTarget):
20            self.stdout.write(f'{Target} is a subclass of BaseTarget, updating existing Targets.')
21            base_targets = BaseTarget.objects.all()
22            targets = Target.objects.all()
23            for base_target in base_targets:
24                # If the base_target is not already in the new target model, update it
25                # Note: subclassed models share a PK with their parent
26                if not targets.filter(pk=base_target.pk).exists():
27                    self.stdout.write(f'Updating {base_target}...')
28                    target = Target(basetarget_ptr_id=base_target.pk)  # Create a new target with the base_target PK
29                    target.__dict__.update(base_target.__dict__)  # add base_target fields to target dictionary
30                    target.save()
31                    # re-add permissions for existing users and groups
32                    group_set = set(gop.group for gop in GroupObjectPermission.objects.filter(object_pk=target.pk))
33                    user_set = set(uop.user for uop in UserObjectPermission.objects.filter(object_pk=target.pk))
34                    for group in group_set:
35                        target.give_user_access(group)
36                    for user in user_set:
37                        target.give_user_access(user)
38            self.stdout.write(f'{Target.objects.count()} Targets updated.')
39
40        return
Once this file is created, you can run the following command to convert your old targets to the new model:
./manage.py convert_targets
Once this command is run, all of your old targets will be converted to the new model, but will not have the new fields filled in. You will need to fill in these fields manually, but once you do any non-hidden fields will be displayed on the target detail page.
Any fields added in this way are fully accessible in the TOM Toolkit as Target, and can be used in the same way
as the built-in fields from any custom code you write, the API, or from the admin interface.
Transferring existing Extra Field Data to your Target Fields
If you have been using Extra Fields and have now created a custom target model, you may want to transfer the data
from the Extra Fields to the new fields in your custom target model. This can be done by running a management
command called converttargetextras. To use this command, be sure to have already created your custom target model.
You can run the command without arguments for an interactive walkthrough.
./manage.py converttargetextras
Alternatively, you can run the command with the --target_extra and/or --model_field flags to specify one or
more the of the Extra Field and Target Field names respectively.
./manage.py converttargetextras --target_extra extra_bool extra_number --model_field example_bool example_number
This command will go through each target and transfer the data from the Extra Field to the Target Field. If the
Target Field is already populated with a value other than the default value, the data will not be transferred unless
the --force flag is set. When finished, the Extra Field data will be
deleted, and you will likely want to remove the EXTRA_FIELDS setting from your settings.py file.
Adding Extra Fields
If a user does not want to create a custom target model, they can use the EXTRA_FIELDS
setting to add extra fields to the Target model. This method is simpler and does not require
any database migrations, but is less flexible than creating a custom target model.
Note: There is a performance hit when using extra fields. Try to use the built in fields whenever possible.
Enabling extra fields
EXTRA_FIELDS can be implemented in two different ways. If a user wants to add a unique extra field to a individual
target, that can be done by either adding a “Tag” to a target through the UI, or by adding a single extra field
programmatically. If the user instead wants a common extra field to be available for all targets, they can follow these
instructions:
To start, find the EXTRA_FIELDS definition in your settings.py:
# Define extra target fields here. Types can be any of "number", "string", "boolean" or "datetime"
# For example:
# EXTRA_FIELDS = [
#     {'name': 'redshift', 'type': 'number'},
#     {'name': 'discoverer', 'type': 'string'}
#     {'name': 'eligible', 'type': 'boolean'},
#     {'name': 'dicovery_date', 'type': 'datetime'}
# ]
EXTRA_FIELDS = []
We can define any number of extra fields in the array. Each item in the
array is a dictionary with two values: name and type. Name is simply
what you would like to name your field. Type is the datatype of the
field and can be one of: number, string, boolean or
datetime. These types allow the TOM Toolkit to properly store,
filter and display these values elsewhere.
As an example, let’s change the setting to look like this:
EXTRA_FIELDS = [
    {'name': 'redshift', 'type': 'number'},
]
This will make an extra field with the name “redshift” and a type of “number” available to add to our targets.
Using extra fields
Now if you go to the target creation page, you should see the new field available:

And if we go to our list of targets, we should see redshift as a field available to filter on:
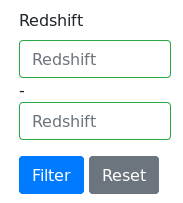
Extra fields with the number type allow filtering on range of
values. The same goes for fields with the datetime type. string
types to a case insensitive inclusive search, and boolean fields to
a simple matching comparison.
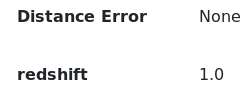
Of course, redshift does appear on our target’s display page as well:
To hide extra fields from the target page, we can set the “hidden” key (this doesn’t affect filtering and searching):
EXTRA_FIELDS = [
    {'name': 'redshift', 'type': 'number', 'hidden': True},
]
And we can set a default value for an extra field by including a default key/value pair:
EXTRA_FIELDS = [
    {'name': 'redshift', 'type': 'number', 'default': 0},
]
Displaying extra fields in templates
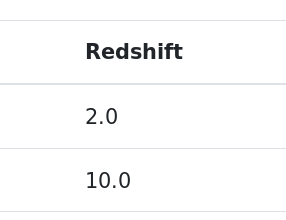
If we want to display the redshift in other places, we can use a template filter to do that. For example, we might want to display the redshift value in the target list table.
At the top of our template make sure to load targets_extras:
{% raw %}
 {% load targets_extras %}
{% endraw %}
Now we can use the target_extra_field filter wherever a target
object is available in the template context:
{% raw %}
 {{ target|target_extra_field:"redshift" }}
{% endraw %}
The result is the redshift value being printed on the template:
Working with extra fields programmatically
If you’d like to update or save extra fields to your targets in code,
there are a few methods you can use. The simplest is to simply pass in a
dictionary of extra data to your target’s save() method using the
extras keyword argument:
target = Target.objects.get(name='example')
target.save(extras={'foo': 42})
The example target above will now have an extra field “foo” with the value 42.
For more precise control, you can access TargetExtra models
directly. To remove an extra, for example:
target = Target.objects.get(name='example')
target_extra = target.targetextra_set.get(key='foo')
target_extra.delete()
The above deleted the target extra on a target with the key of “foo”.