Writing an observation module to interface with observatories
This guide will walk you through how to create a custom observation facility module using some mocked up endpoints to simulate a real observatory interface.
You can use this example as the foundation to build an observing facility module to connect to a real observatory.
Be sure you’ve followed the Getting Started guide before continuing onto this tutorial.
What is a observing facility module?
A TOM Toolkit observing facility module is a python module which contains the code necessary to provide an interface to an observing facility in a TOM. Some examples of existing modules are the Las Cumbres Observatory and the Gemini modules. Both allow the submission of observation requests to their respective observatories through a TOM.
Prerequisites
You should have a working TOM already. You can start where the Getting Started guide leaves off. You should also be familiar with the observing facility’s API that you would like to work with.
Defining the minimal implementation
Within any existing module in your TOM you should create a new python module
(file) named myfacility.py. For example, if you have a fresh TOM installation
you’ll have a directory structure that looks something like this:
├── data
├── db.sqlite3
├── manage.py
├── mytom
│   ├── __init__.py
│   ├── settings.py
│   ├── urls.py
│   └── wsgi.py
├── static
├── templates
└── tmp
We’ll place our myfacility.py file inside the mytom directory, next to
settings.py. For now, copy the following lines into myfacility.py:
from tom_observations.facility import GenericObservationFacility, GenericObservationForm


class MyObservationFacilityForm(GenericObservationForm):
    pass


class MyObservationFacility(GenericObservationFacility):
    name = 'MyFacility'
    observation_types = [('OBSERVATION', 'Custom Observation')]
We’ll go over what these lines mean soon. First, we’ll add a setting to our
project’s settings.py to tell the TOM Toolkit to use our new class:
TOM_FACILITY_CLASSES = [
    'tom_observations.facilities.lco.LCOFacility',
    'tom_observations.facilities.gemini.GEMFacility',
    'mytom.myfacility.MyObservationFacility'
]
Now go ahead and view a target in your TOM, you should see something like this:
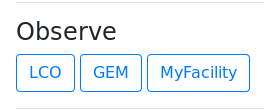
This means our new observation facility module has been successfully loaded.
GenericObservationFacility and GenericObservationForm
You will have noticed our module consists of two classes that inherit from two other classes.
MyObservationFacility is the class that will contain the “business logic”
for interacting with the remote observatory. This includes methods to submit
observations, check observation status, etc. It inherits from
GenericObservationFacility, which contains some functionality that all
observation facility classes will want.
MyObservationFacilityForm is the class that will display a GUI form for our
users to create an observation. We can submit observations programmatically, but it
is also nice to have a GUI for our users to use. The GenericObservationForm
class, just like the previous super class, contains logic and layout that all
observation facility form classes should contain.
Implementing observation submission
Try to click on the button for MyFacility.
It should return an error that says everything it’s missing:
Can't instantiate abstract class MyObservationFacility with abstract methods
data_products, get_form, get_observation_status, get_observation_url, get_observing_sites,
get_terminal_observing_states, submit_observation, validate_observation
To start, let’s define new functions in MyObservationFacility
for each missing function like so:
class MyObservationFacility(GenericObservationFacility):
    name = 'MyFacility'
    observation_types = [('OBSERVATION', 'Custom Observation')]

    def data_products(self):
        return

    def get_form(self):
        return
    ...
Reload the server, click the MyFacility button, and you should get …
a different error! Progress!
get_form() takes 1 positional argument but 2 were given
To fix up get_form, adjust it to:
    def get_form(self, observation_type):
        return MyObservationFacilityForm
Reload the page and now it should look something like this:
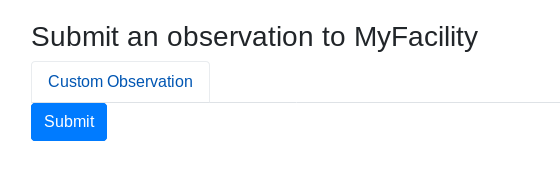
Some notes:
The form is empty, but we’ll fix that next.
The
namevariable ofMyObservationFacilitydetermines what the top of the page says (Submit an observation to MyFacility). It also determines the name of the button under “Observe” on the target’s page.You should see a tab for
Custom Observationas the only option on the page. This is read from theobservation_typesvariable inMyObservationFacility. That variable is a list of 2-tuples. The second value of each tuple is what will be displayed on the webpage, as different tabs of observation types to submit. The first value of each tuple is what should be used to distinguish different observation types in your code. To see a demonstration of this, check out the Las Cumbres Observatory facility’sobservation_typesandget_form.
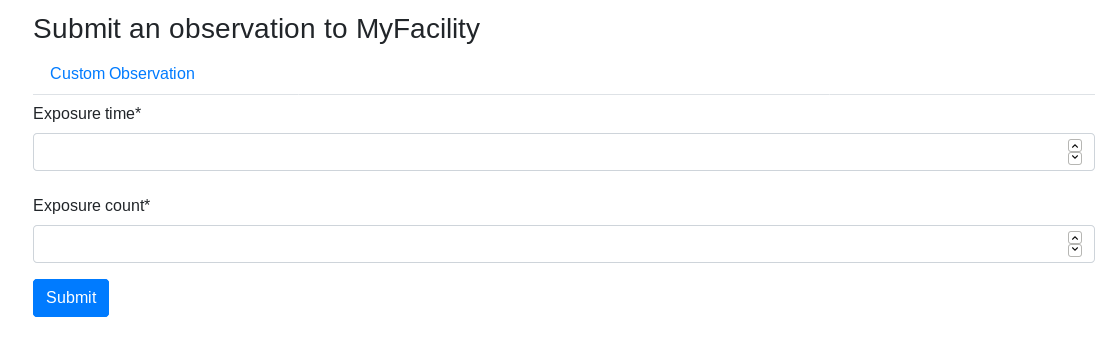
Now let’s populate the form. Let’s assume our observatory only requires us to send 2 parameters (besides the target data): exposure_time and exposure_count. Let’s start by adding them to our form class:
from django import forms
from tom_observations.facility import GenericObservationFacility, GenericObservationForm


class MyObservationFacilityForm(GenericObservationForm):
    exposure_time = forms.IntegerField()
    exposure_count = forms.IntegerField()
Notice that we’ve added the two field definitions on our form. We’ve also imported
the django form module with from django import forms.
Now if we reload the page, we should see something like this:
This is progress, but remember that most of the functions in MyObservationFacility
have blank return statements.
Next we’ll implement the methods that perform actions with our form when we
submit the observation request:
from django import forms
from tom_observations.facility import GenericObservationFacility, GenericObservationForm

class MyObservationFacilityForm(GenericObservationForm):
    exposure_time = forms.IntegerField()
    exposure_count = forms.IntegerField()

class MyObservationFacility(GenericObservationFacility):
    name = 'MyFacility'
    observation_types = [('OBSERVATION', 'Custom Observation')]

    def data_products(self, observation_id, product_id=None):
        return []

    def get_form(self, observation_type):
        return MyObservationFacilityForm

    def get_observation_status(self, observation_id):
        return ['IN_PROGRESS']

    def get_observation_url(self, observation_id):
        return ''

    def get_observing_sites(self):
        return {}

    def get_terminal_observing_states(self):
        return ['IN_PROGRESS', 'COMPLETED']

    def submit_observation(self, observation_payload):
        print(observation_payload)
        return [1]

    def validate_observation(self, observation_payload):
        pass
The important method here is submit_observation. This method, when implemented
fully, will send the observation payload to the remote observatory and then return
a list of observation ids. Those ids will be stored in the database to be used
later, in methods like get_observation_status(self, observation_id). In our
dummy implementation, we simply print out the observation payload and return a
single fake id with return [1].
If you now “submit” an observation using the MyFacility module, you should see this in the server console:
{'target_id': 1, 'params': '{"facility": "MyFacility", "target_id": 1, "observation_type": "(\'OBSERVATION\', \'Custom Observation\')", "exposure_time": 100, "exposure_count": 2}'}
That was our print statement!
Additionally, you should see 1 upcoming observation on the target’s page,
and if you navigate to its “Observations” tab you can see the parameters of the
observation you just submitted in more detail.
Filling in the rest of the functionality
You’ll notice we added many more methods other than submit_observation to our
Facility class. For now they return dummy data, but when you adapt it to work with
a real observatory you should fill them in with the correct logic so that the
whole module works correctly with the TOM. You can view explanations of each
method in the source
code
###Airmass plotting for new facilities The last step in adding a new facility is to get it to appear on airmass plots. If you input two dates into the “Plan” form under the “Observe” tab on a target’s page, you’ll see the target’s visibility. By default, the plot shows you the airmass at LCO and Gemini sites.
In our MyObservationFacility class, let’s define a new variable called SITES.
Modeling our SITES on the one defined for
Las Cumbres Observatory,
we can easily put new sites into the airmass plots:
class MyObservationFacility(GenericObservationFacility):
    name = 'MyFacility'
    observation_types = [('OBSERVATION', 'Custom Observation')]

    SITES = {
        'Itagaki': {
            'latitude': 38.188020,
            'longitude': 140.335113,
            'elevation': 350
        }
    }

    ...

    def get_observing_sites(self):
        return self.SITES
(Koichi Itagaki is an “amateur” astronomer in Japan who has discovered many extremely interesting supernovae.)
Now the new observatory site should show up when you generate airmass plots. Even if the facilities you observe at are not API-accessible, you can still add them to your TOM’s airmass plots to judge what targets to observe when.
Happy developing!